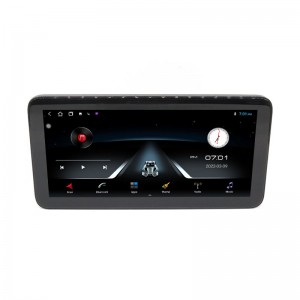


7 9 10 inch Car Radio Android 1Din Multimedia 1 Din Player
Product Description

|
type |
|
|
OS |
Single spindle universal machine |
|
configuration |
Android System |
|
decoding chip |
GPS/BT/USB/ |
|
screen size |
MTK |
|
screen resolution |
7INCH 9INCH 10INCH |
|
Box Size |
1024*600 |
|
Total weight |
300mm*190mm*160mm |
|
support |
1.85kg |
|
Band |
Carplay ,Android,gps, |
|
Radio chip |
FM |
|
language |
4730 |
|
Reversing video |
Chinese, Japanese, South African, German, Estonian, English, Spanish, French, Italian,Indonesia, Malaysia, Qatar, Denmark, Philippines, Litaoyuan, Croatia,Hungary. The Netherlands, Norway, Poland, Vietnam, Bulgaria, South Korea, Slovenia |
|
Brake alert function |
Yes |
|
Steering wheel control function |
Yes |
|
bluetooth |
Yes |
|
RFI |
Support, version 4.0, support Bluetooth music, Bluetooth phone |
|
USB interface |
FM87.5M-108M |
|
SR |
Version 2.0 has 2 tail-line outputs |
|
RCA Terminal introduced |
Yes |
|
Supported audio formats |
1 way astern,2 ways video input,2 ways audio input, 4 ways audio output,2 ways video input, 1 way super bass output |
|
MPEG |
MP3,FLAC,APE,WMA,WAV,AAC,AMR... |
|
VIualBasic |
AVI,ASF,MP4,MOV,MPG,MPEG 1/2/4,VOB,MKV,FLV,TS,WMV,RMVB,3GP,1080P... |
|
operating voltage |
JPG |
|
power output |
DC 9 - 17V |
|
Bluetooth version |
4 x 45W |
|
Bluetooth distance |
Version 4.0 |
|
CPU |
10m |
|
GPU |
Placeholder-4 cores |
|
Picture |
Mali- 400MP |
|
Storage Configuration |
JPEG,GIF,PNG,BMP |
|
OperationTemperature |
1+16G/2+32G |
|
storage temperature |
:-20℃〜60℃ |
|
The whole list |
:-20℃〜70℃ |
|
|
Main engine, manual, tail line |
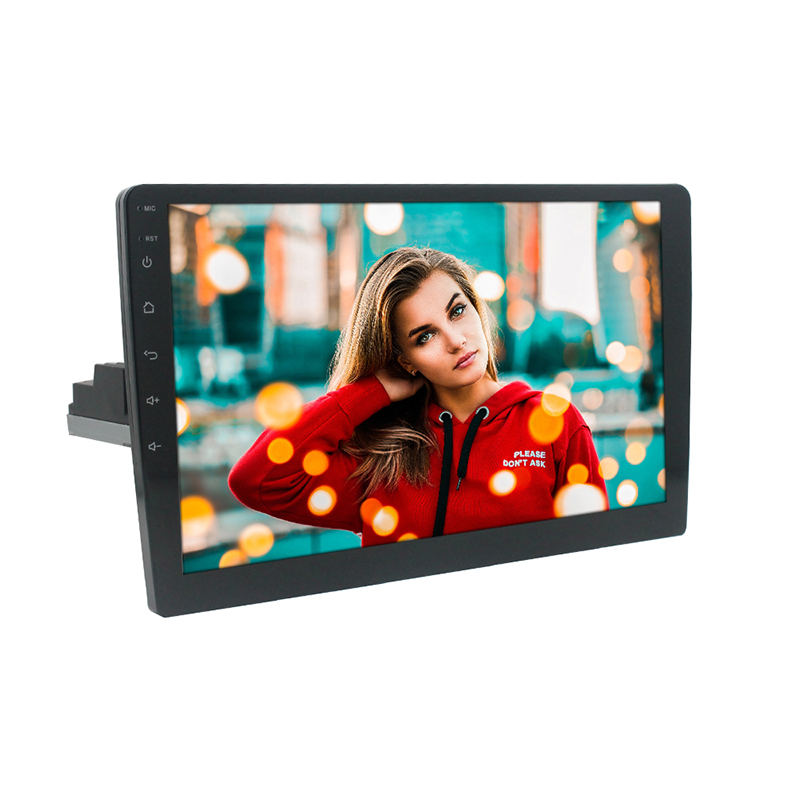
Product Display
Packaging & Delivery
Selling Units: Single item;
Single package size: 32X20X10 cm;
Single gross weight:1.450 kg;
Package Type
7 inch Neutral color box packing
1 set packing size 22*14*12 cm(0.98 kgs )
16 sets a box packing size: 62*46*30.5 cm(19kgs)
9 inch Neutral color box packing
1 set packing size 29.5*19*10.5 cm
12 sets a box packing size:60*39.5*32.5 cm
10.1 inch Neutral color box packing
1 set packing size 31*20*8.5 cm(1.45 kgs )
12 sets a box packing size:60*39.5*32.5 cm(17 kgs )
Features

1. Android 10.1 operating system.
2. Memory 1G+Storage 16G.
3. 10” (1024 * 600) capacitive screen.
4. Support phonelink function.
5. Two USB Function.
6. Built-in AM /FM Radio.
7. Multi-format audio and video decoding, support 1080P full-format.
8. Support rear view camera input.
9. Internet APP download, install, uninstall.
Machine reset
1. The first use of the system before or after the replacement battery, the machine must be reset.
2. When the machine function is not normal, the machine must be reset.
3. Click restore factory settings in system settings interface, make the machine is in the initial state.
4. Use a pointed object, press the RESET button on the panel, or click the system RESET in the system settings, the machine will be RESET to turn it off, back to the factory the initial state.
Note: press the RESET button and the system initialization will lose time and set the value before.
IPHONELINK MENU
1. Open mobile phone hotspot and select your hotspot in the list.
2. Slide up your iPhone, click the AirPlay mirror.
3. Scan QR code and Download TIMAAPP, install TIMA APP.
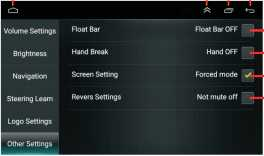
Go to the settings interface, other settings, find the Float Bar and choose to tick.
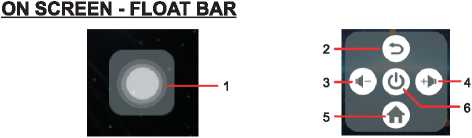
1. Float Bar can appear in any interface, touch to open the shortcut menu.
2. Touch to shift screen to return to the previous interface.
3. Touch to reduce the volume.
4. Touch to increase the volume.
5. Touch to shift screen to MAIN MENU.
6. Touch to shutdown the machine.
1. Touch to shift screen to MAIN MENU.
2. Touch to hide the shortcut menu button area. Tauch the top and pull-down of the
screen and wake up the shortcut menu button.
3. Touch to display all the programs running in the background, where you can choose to close the programs running in the background.
4. Touch to shift screen to return to the previous interface.
5. Touch to shift screen to ANDROIDLINK MENU.
6. Touch to shift screen to IPHONELINK MENU.
7. Touch to display information about the software.
8. Touch to enter the file transfer interface.
9. Touch to open a QR code and the phone scans the QR code to download the TIMA
APP.
ANDROIDLINK MENU
1. Use USB cable to connect mobile phone.
2. Open the developer option on the phone, enter the developer option, and open USB debugging.
3. Open TIMA app, and complete the connection according to prompt on mobile phone.
Note: If the developer nption is not found in the phone settings, please go to About the phone and click on the version number 7 times in succession. You will be prompted: You are already in developer mode.
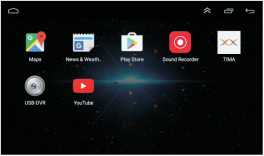
On screen - icon desktop
Bluetooth
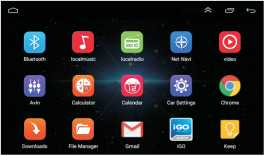
Connection method: the machine power on, mobile phone open Bluetooth function, search equipment, the default Bluetooth name of the machine is: Car BT, after searching for the name, click on the paired connection, connection password: 0000.
Other Settings
1.Touch to shift screen to MAIN MENU.
2.Touch to hide the shortcut menu button area. Touch the top and pull-down of the screen and wake up the shortcut menu button.
3.Touch to display all the programs running in the background, where you can choose to close the programs running in the background.
4.Touch to shift screen to return to the previous interface.
5.Float Bar: After touching the hook, Fload Bar(Page) will appear on the screen, you can click Fload Bar to open the shortcut button.
6.Hand Break: Touch screen selection tick. When this switch is turned on, watching the video being played will not be allowed during the driving process. When this switch is turned off, you can watch the video in play at any time.
INTRODUCTION TO BASIC FUNCTIONS
Main Unit ODeration.
Symbol/Function Operations & Controls.
MIC For voice operation, press under Bluetooth operation.
RST Press with a pointed object (such as ball point) to reset the unit
to its initial setting by the factory (default stage).
(2) When the unit is turned off, press to turn on the nuit.
" When the unit is turned on, long press for 3 seconds to turn turn off the unit, and short press repeatedly to mute and relieve mute. Press to the MAIN MENU.
Press to return to the previous interface.
+ Press repeatedly or press & hold to increase sound output level.
- Press repeatedly or press & hold to reduce sound output level.
*Touch the icon on the desired mode on screen and the unit will then enter into the mode that selected for operation.
*Hold & slide the operation icon on screen to shift to other MAIN MENU that shows the hidden input or operation icons.
1.Touch to shift screen to MAIN MENU.
2.Touch to hide the shortcut menu button area. Touch the top and pull-down of the screen and wake up the shortcut menu button.
3.Touch to display all the programs running in the background, where you can choose to close the programs running in the background.
4.Touch to shift screen to return to the previous interface.
5.Touch to clear all learned steering wheel buttons.
6.List of steering wheel keys that can be used for learning.
Steering wheel button learning method:
Connect KEY1 and KEY2 on the power cord plug of the machine to the steering wheel control line of the original car. After touching a button icon on the screen, quickly find the corresponding function button on the original car steering wheel, and press the button to not release until the machine screen prompts Setup success! indicating that the learning has succeeded, and the next button can be learned.
Logo Settings
1. Logo Set: The user can set the car logo displayed when the machine is turned on. The user can select from the pictures preset by the system, or select from user uploaded pictures.
2. Animation: The user can set the animation when the machine is turned on. The user can select from the animation preset by the system, or select from user uploaded animation.
3.Touch to display all the programs running in the background, where you can choose to close the programs running in the background.
4. Touch to shift screen to return to the previous interface.
5. After touching the hook, boot automatically run navigation.
6. If multiple navigation software is installed in the system, After touching the hook, the system will always ask which navigation software should be opened each time the navigation is started.
7. A list of navigation software installed in the system, the user can select one of the navigation software, when the navigation is turned on, the system will automatically run the navigation software.
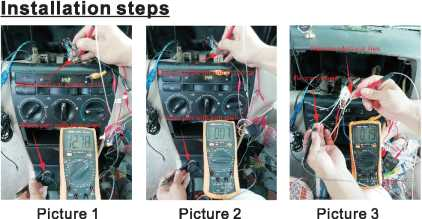
1. How to find the power cord of the car ?
First turn the car key to the ACC state. Then regulate the Universal Watch to the 20V gear. Connect the black stylus to the power ground (the outer ironclad of the cigar lighter) and use the red stylus to test each wire of the car. Normally a car has two wires about 12V(some cars only have one). That is the positive pole line. How to distinguish the ACC and memory line? Pull out the car key after you find the two positive pole lines. The memory line is the electrically charged one after you nuplug the key. *(Look the Picture 1).
2. How to find the ground wire of the car (negative pole)?
Turn the Universal Watch to the on/off beep gear. Then connect the black stylus to the power ground (the outer ironclad of the cigar lighter) and use the red stylus to test each wire except the two power lines. The energized one is the ground wire(negative pole). Some cars have two ground wires. * (Look the Picture 2).
3. How to find the horn line of the car?
Turn the Universal Watch to the on/off beep gear. Connect the black stylus to any wire except the power cord and ground wire. Then use the red stylus to test each remaining wire. The energized one is the horn wire. Then use the same method to find out the other horn lines. *(Look the Picture 3).
4. How to test whether the unit work properly?
When you get the unit, you'd better test the unit with battery or power supply before installation. Wire connection method: Twist the red wire and yellow wire together and then connect them to the positive pole. Connect the black wire to the negative pole. Then press the switch to turn on the unit and get a horn to connect to the horn wire. (Two wires connected to the horn are of the same color. The white wire is supposed to be connected to the positive pole and the white one with black part connected to the negative pole of the horn. You can make no distinction between the positive and negative poles of the horn.) Then test the function of the unit 08
5. How to connect Bluetooth?
Turn on the uint and initiate Bluetooth function of phone, and then search for the user name of the unit. Click the connect button and the phone will show it is connected. If you want to play music with Bluetooth, press the function transition button to switch to Bluetooth mode and then click songs on your phone. You can also dial numbers on your phone to make a phone call with Bluetooth.
6. How to fix the unit ?
Since each car has a different way of fixing the unit and the location of the screws are different, there is no defined way to fix the unit You may consult the fixing method of the original unit If it was fixed by tightening screws with the steel angle, you can unload the steel angle of the original unit to both sides of our unit, then use the electrician tape to tight the steel angle (since screw hole size is probably unmatched). If the original unit was fixed with iron frame, you can fix the iron frame of our unit in the car first, and then push the unit to fasten it. If the size is not fit, you can wrap the unit with electrician tape to increase the volume of the unit, and then put it in and fasten it. Or you can think of a better way to fix it, but anyway, you can fix it.
7. How to install the navigation antenna ?
First you should tighten the screws of the navigation antenna and the unit. Then you must fix the navigation antenna module in a place that has sunlight or on the windshieled. (Thats very important because poor installation will affect navigation signals.)
8.The default factory mode password
Factory mode password : 8888
9.The default Bluetooth Pin Code
Bluetooth Pin Code : 0000
Android Settings
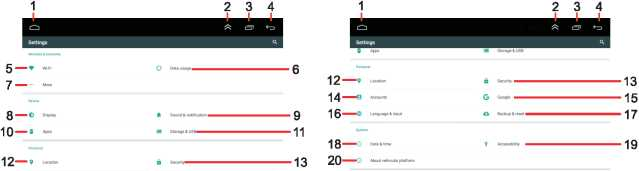
1. Touch to shift screen to MAIN MENU.
2. Touch to hide the shortcut menu button area. Touch the top and pull-down of the screen and wake up the shortcut menu button.
3. Touch to display all the programs running in the background, where you can choose to close the programs running in the background.
4. Touch to shift screen to return to the previous interface.
5. WIFI: Touch to open the WIFI connection interface, search for the WIFI name you need, then click on the connection.
6. Data usage: Touch to open the monitoring interface for data usage. You can view the usage of data traffic in the corresponding date.
7. More: you can turn on or off the Airplane mode, setting Tethering & portable hotspot.
8. Display: Touch to open Display interface. You can setting the Wallpaper and Font size, Turn on or turn off the video output function of the machine.
9. Sound & notification: Touch to open Sound & notification interface. The user can set the alarm clock, the bell and the key tone of the system.
10. Apps: Touch to open Apps interface. You can separately view that all the apps that have been installed on the machine.
11. Storage & USB : Touch to open Storage & USB interface. You can see the total capacity and usage of built-in memory and the expanded memory.
12. Location: Touch to get the current location information.
13. Security: Touch to set up security options for the system.
14. Accounts: Touch to view or add user information.
15. Google: Touch to setting Google server information.
16. Language & input: Touch to set up language for the system, how many more the 40 languages to choose from, and you can also set up the system's input method on this page.
17. Backup & reset: Touch to shift screen to Backup & reset interface. You can perform the following actions on this page:
①Back up my data: Back up app data, WIFI passwords and other settings to Google servers.
②Backup account: Need to set the backup account.
® Automatic restore: When reinstalling an app, restore backed to setting and data.
18. Date & time: Touch to open Date & time interface. In this interface, you can do the following:
® Automatic date & time: You can set it to : Use metwork-provided time / Use GPS-provided time / Off.
②Set date: Touch to set the date, provided that Automatic date & time must be set to Off.
③Set time: Touch to set the time, provided that Automatic date & time must be set to Off.
④Select time zone: Touch to set the time zone.
⑤Use 24-hourfomat: Touch to switch the time display format to 12-hour or 24-hour.
19. Accessibility: Touch to open Accessibility interface. Users can perform the following operations:
® Captions: Users can turn on or turn off the captions, and setting Language, Text size, Caption style.
②Magnification gestures: Users can turn on or turn off this operation.
③Large text: Turn on this switch to make the font displayed on the screen larger.
④High contrast text: Users can turn on or turn off this operation.
⑤Touch & hold delay: Users can choose three modes: Short, Medium, Long.